
I won 5th place in LA CTF 2025 with my team. I found a handful of the challenges I solved pretty cool so I wrote up my solutions and process for them
Prologue⌗
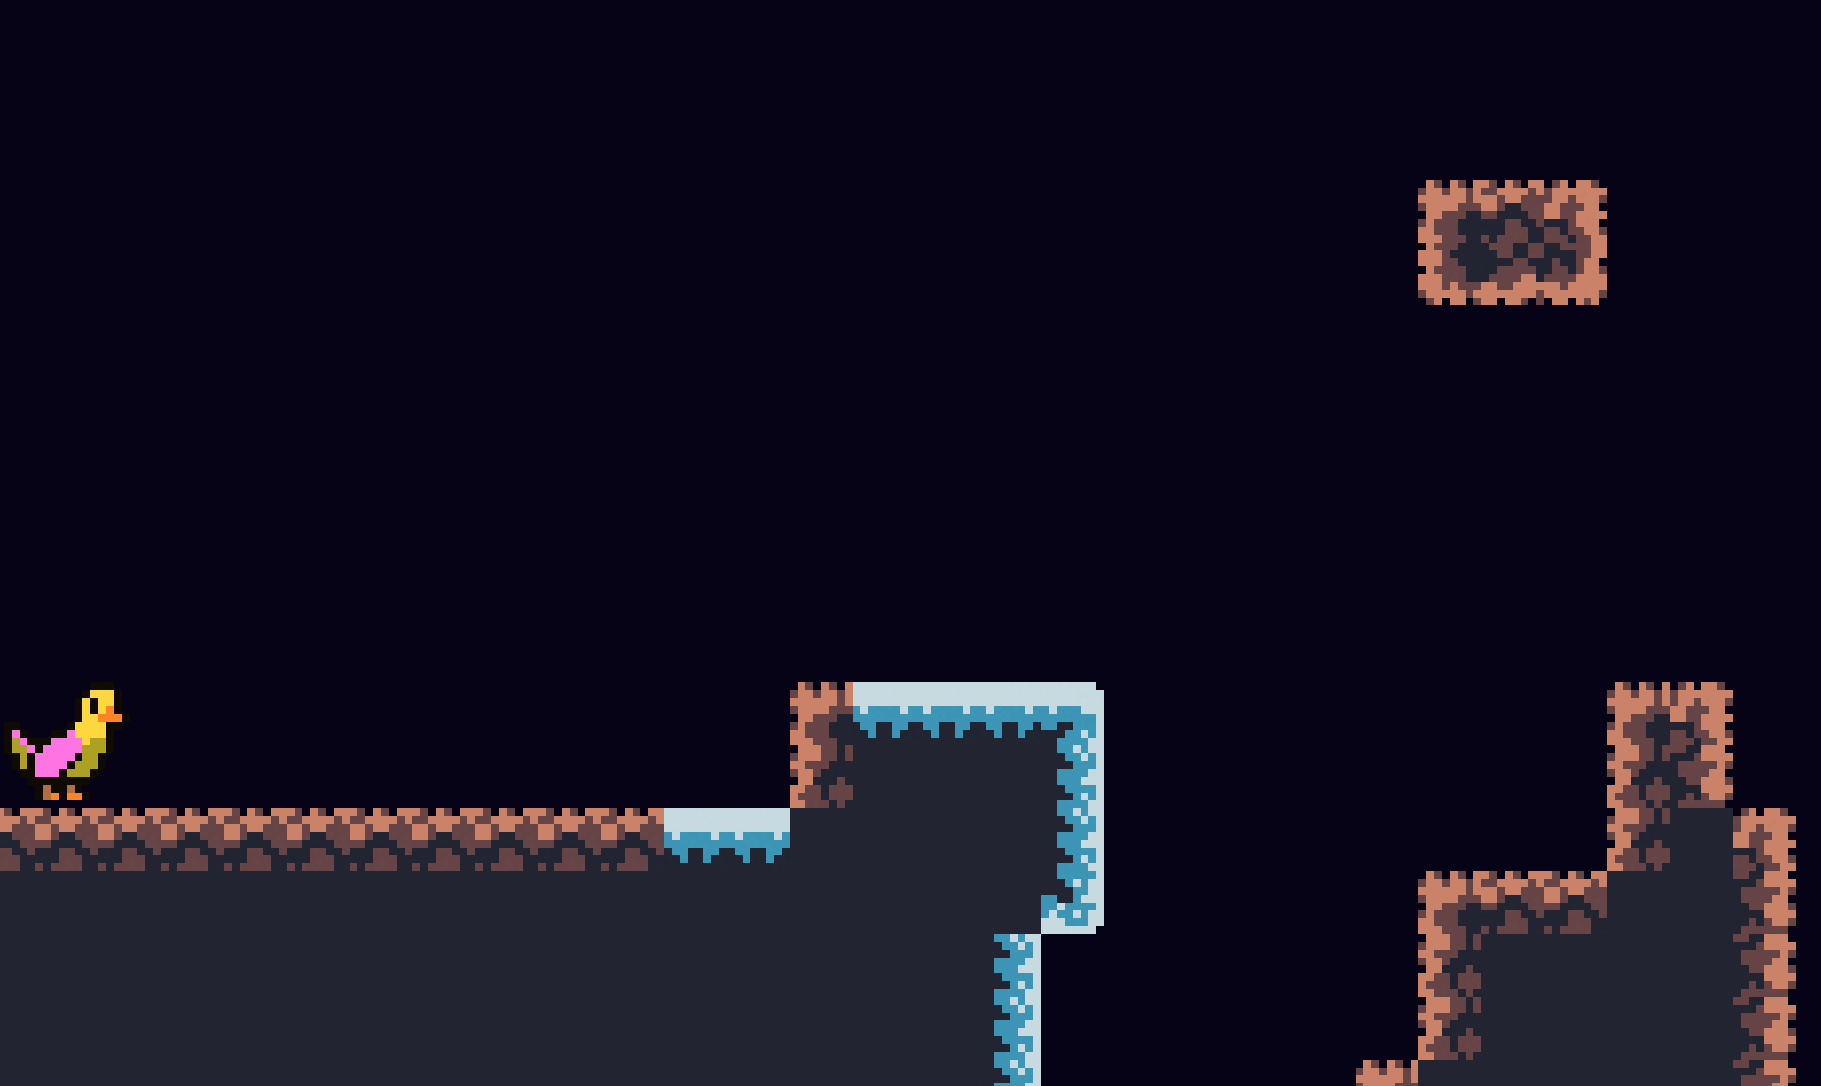
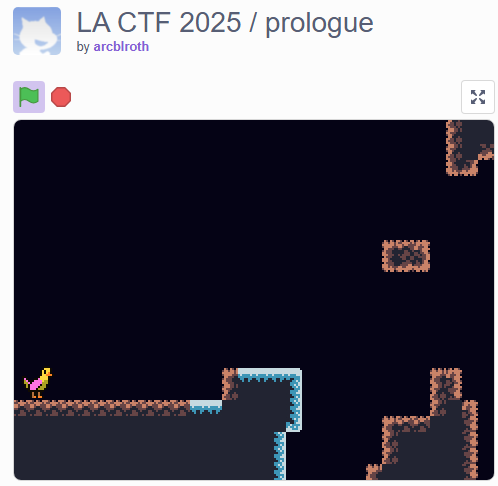
This was my favorite challenge from this event by far. The challenge only gave us a link to a Scratch project with the description “You can do this.”
After opening the project and clicking play, I could see what appeared to be a platformer game that very clearly resembled the intro level of Celeste (also titled Prologue)
Only after seeing this did I read the project notes, which expanded upon this to say
C to jump
Z + arrow to climb
X + arrow to dash (only unlocked at the very end)

An LA CTF 2025 reverse-engineering challenge!
Heavily based off of Celeste, especially Maddy's description of its platforming code at https://maddymakesgames.com/articles/celeste_and_towerfall_physics/index.html.
All sprites were created by me in Aseprite.
Opening the editor with the “See Inside” button only shows us a single note, also with the contents “You can do this.”
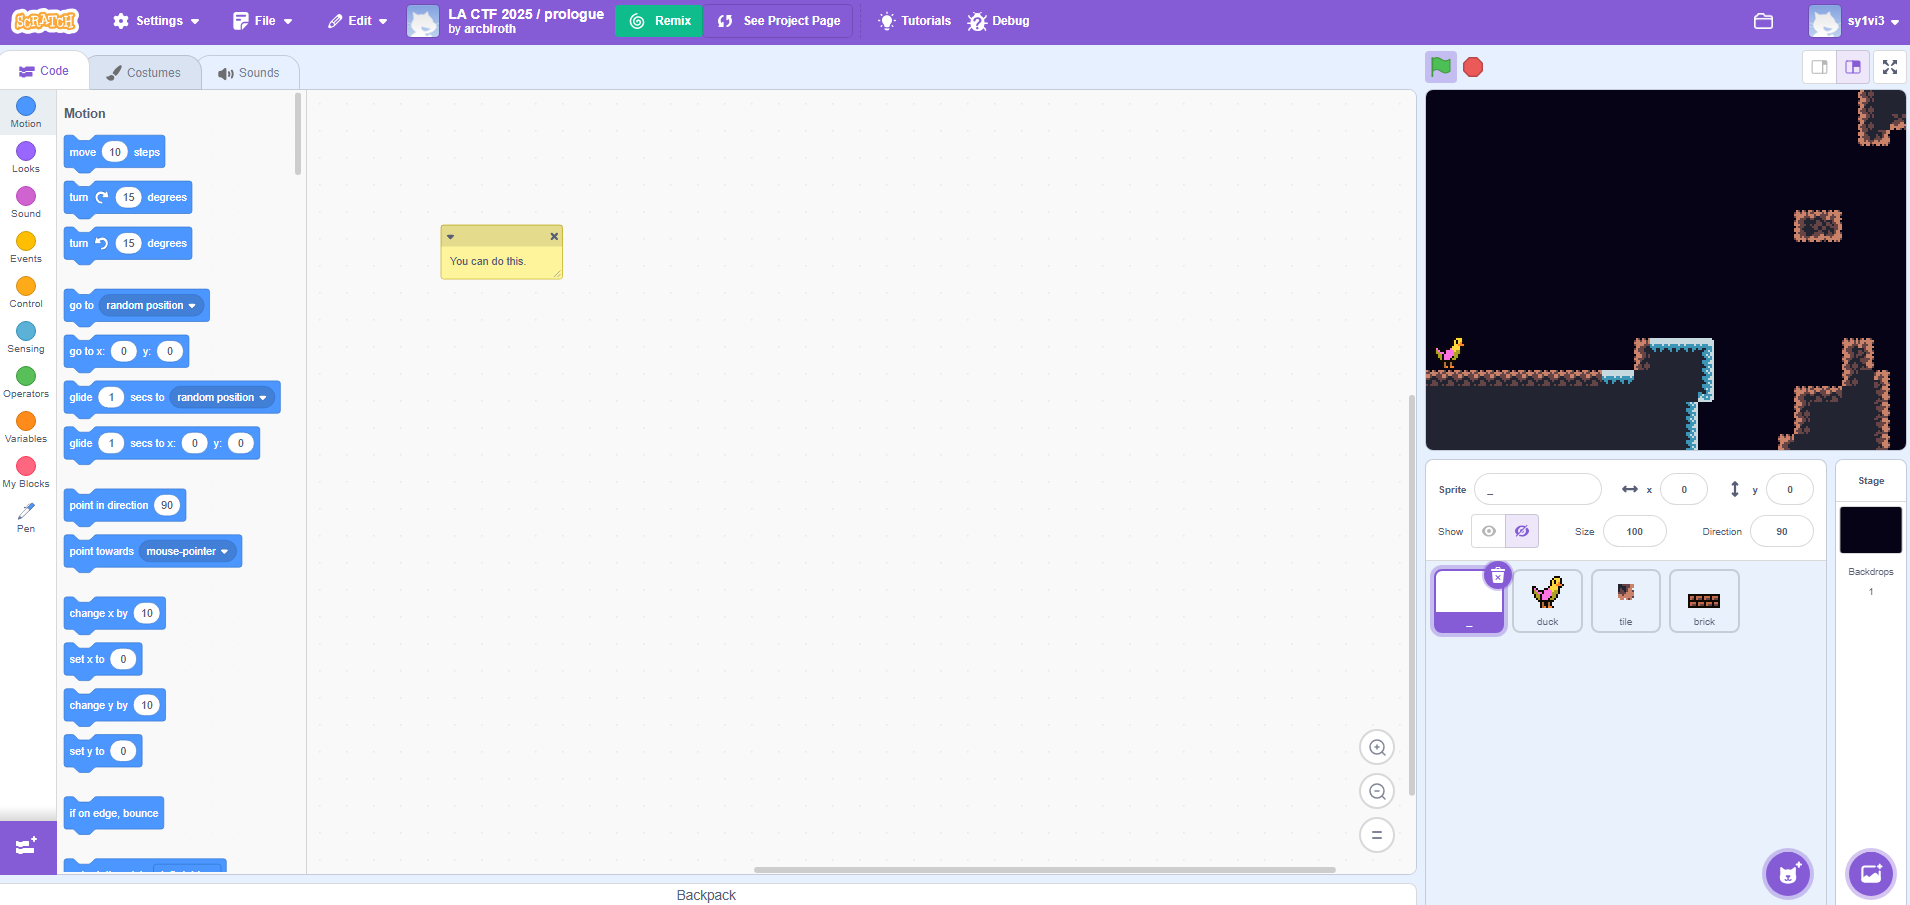
There weren’t any other visible blocks or variables in any of the objects, despite there clearly needing to be for the game to work. The obvious next step from here was downloading the project and inspect the files locally. Scratch projects come in their .sb3 format, which is really just a zip file.
Opening it up, we can see all of the sprites, as well as project.json that contains all of the block code as an abstract syntax tree.
The project was readable, but barely. Most of it looked like this,
{"opcode":"event_whenflagclicked","next":"1","parent":null,"inputs":{},"fields":{},"shadow":true,"topLevel":true,"x":0,"y":0},"1":{"opcode":"data_setvariableto","next":"2","parent":"0","inputs":{"VALUE":[2,[4,239]]},"fields":{"VARIABLE":["iiiiiіiі","iiiiiіiі"]},"shadow":true,"topLevel":false},"2":{"opcode":"data_setvariableto","next":"4","parent":"1","inputs":{"VALUE":[2,[4,25]]},"fields":{"VARIABLE":["iiiiiііi","iiiiiііi"]},"shadow":true,"topLevel":false},"4":{"opcode":"data_setvariableto","next":"6","parent":"2","inputs":{"VALUE":[2,[4,0]]},"fields":{"VARIABLE":["iiiiіiii","iiiiіiii"]},"shadow":true,"topLevel":false},"6":{"opcode":"data_setvariableto","next":"8","parent":"4","inputs":{"VALUE":[2,[4,0]]},"fields":{"VARIABLE":["iiiiiііі","iiiiiііі"]},"shadow":true,"topLevel":false},"8":{"opcode":"data_setvariableto","next":"10","parent":"6","inputs":{"VALUE":[2,[4,-248]]},"fields":{"VARIABLE":["iiiiіiiі","iiiiіiiі"]},"shadow":true,"topLevel":false},"10":{"opcode":"data_setvariableto","next":"12","parent":"8","inputs":{"VALUE":[2,[4,-180]]},"fields":{"VARIABLE":["iiiiіiіi","iiiiіiіi"]},"shadow":true,"topLevel":false},"12":{"opcode":"data_setvariableto","next":"14","parent":"10","inputs":{"VALUE":[2,[4,1]]},"fields":{"VARIABLE":["iiiiіiіі","iiiiіiіі"]},"shadow":true,"topLevel":false}
except for one array of strings that was obviously the level layout
[
"                          DDDSSSSSSSSSSDDD                      ",
"                           DDSSSSSSSSSSDDD                      ",
"                           DDDDDSSSSSSSDDD                      ",
"                           DDDDDSSSSSSDD                        ",
"                           DD  SSSSSSDD                                                              SSS      ",
"                               SSSSSSDD                                                              SSS                                                                                                                                     DDD",
"                                SSSSSSS                                                              SSS                                                                                                                                     DDD",
"                                                                                                     SSS                                                                                                                                     DDD",
"                                                                                                     SDS                                                                                                                                    DDDD",
"                       DDD                                                                           SDD                                                                                                                                    DDDD",
"                       DDD                                                               SS          SD                                                                                                                                    DDDDD",
"                                                                                         SS          SD        DDDdDSSSSSSBBBBBBBBBBBBBBBBBBBBBBBBBBBBBBBBBBBBBBBBBBBBBBBBBBBBBB    BBBBBBBBBBBBBBBBBBBBBBBBBBBBBBBBBBBBBBBBBBBBBBBDDDSSDDDDDDDD",
"                                                                                         SS          SD        DDDdDDDSSS                                                                                                          DDDDDDDDDDDDD",
"                                                                        SSSSS            SSS         SS        DDDdDDDDSS                                                                                                          DDDDDDDDDDDDD",
"                                                                        SSSSS            SSS                   DDDdDDDDS                                                                                                           DDDDDDDDDDDDD",
"                                                                        SSSSS            SSS                   DDDdDDDDD                                                                                                              DDDDDDDDDD",
"                                                                        SSSSS             SSSSSS              DDDDdDDDD                                                                                                                 DDDDDDDD",
"             DSSSS        DD                   DD                       SSSS    SSSS      SSSSSS              DDDDdDDDD                                                                                                                 DDDDDDDD",
"             DSSSS        DD    DDDDDDD        DD                       SSSS    SSSS      SSSSSS        SSS   DDDDDDD                                                                                                                      DDDDD",
"DDDDDDDDDDDSSSSSSS        DDD    DDDDDD        DD                       SSSS     SSS      SDSSSS        SS    DDDDDDD                                                                                                                       DDDD",
"DDDDDDDDDDDSSSSSSS     DDDDDD    DDDDD     DDSSDD                   DDSSSSSS     SS       SDSSSS      SSSD     DDDDD                                                                                                                         DDD",
"DDDDDDDDDDDSSSSSS      DDDDDD    DDDDD      DDDDD   DDDDdDDDSSSS     DSSSSDS     DS     DDDDSSSS   SSSSSDD     DDDDD                                                                                                                         DDD",
"DDDDDDDDDDDSSSSSS      DDDDDD    DDDDD      DDDD     DDDdDDDDSS      DDDDDD      DD        DDSSS     SDDDD     DDDD                                                                                       ",
"DDDDDDDDDDDSSSSSS     DDDDDDD    DDDDD       DDD     DDDdDDDDSS      DDDDDD      DD        DDSSS     DDD       DDDD",
"DDDDDDDDDDDSSSSSS     DDDDDDD    DDDDD       DDD     DDDdDDDDSS      DDDDDD      DD        DDSSS     DDD       DDDD"
]
I threw it through a json formatter, which made it a lot easier to read. All of the variable names appeared obfuscated as a binary string of 8 chars of either i or і. One of those is a normal i, and the other is a Cyrillic dotted i. They’re pretty much impossible to tell apart visually without a computer telling you which is which. I resolved this problem by doing a find-replace for the imposter i with a.
Also, notably, all of the blocks were set to shadow: true, which is why they were hidden in the editor. I did another find-replace to fix this.
After fixing both of these things, I re-packed the changed project.json into the sb3 file and opened it with the offline Scratch editor (which is just Electron, but slightly less laggy and nicer to use than from the browser).
With the blocks finally visible, I could start peeking around in the program’s code without driving myself to the point of insanity staring at the AST. It’s also worth mentioning that because of the type of blocks these are, I had to manually mess with the CSS on the site to make the text input fields visible, because by default they were white-text-on-white-background
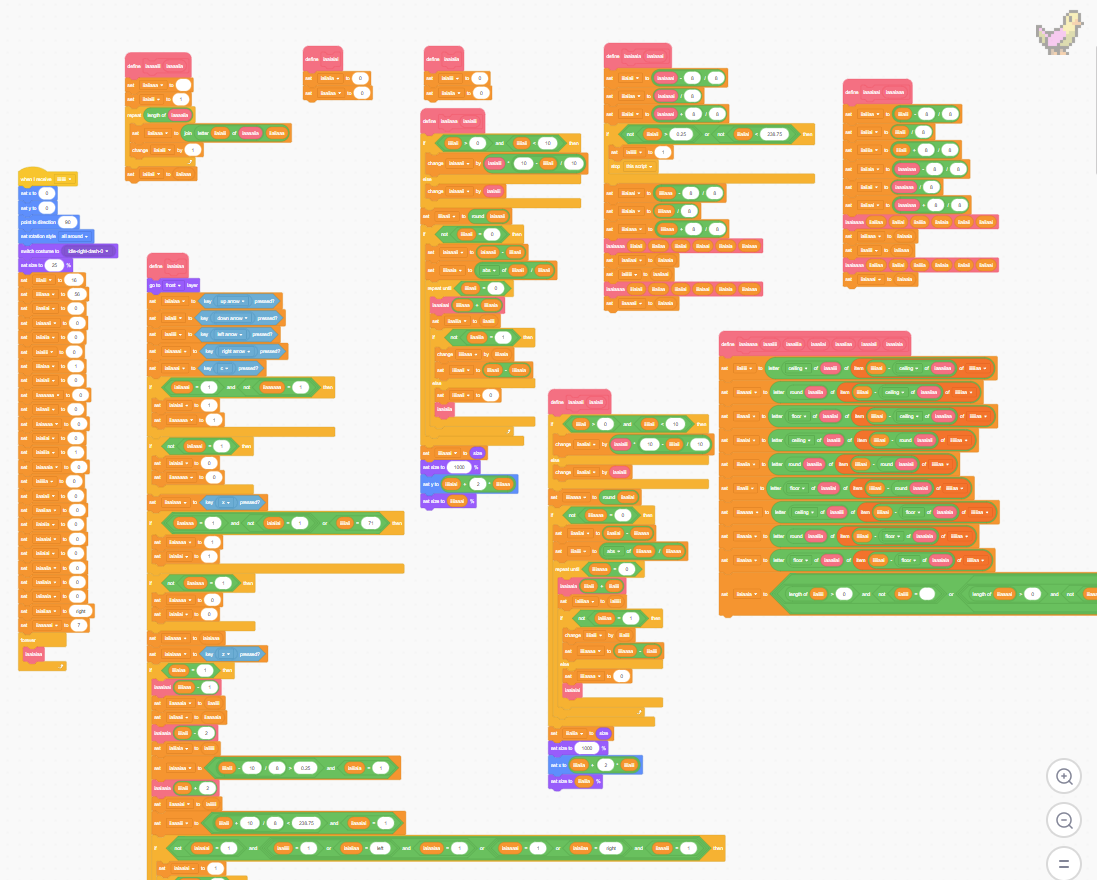
The most interesting thing I could see initally was this, under the brick object
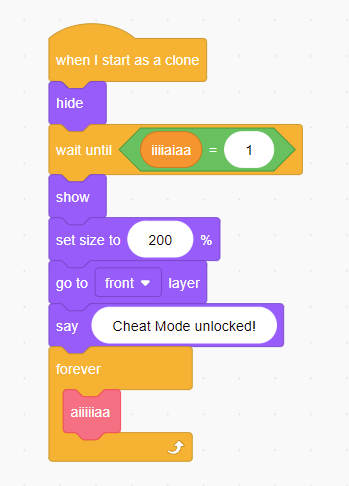
This gets called when a clone of brick is made, so I went hunting for where that could happen and found this in the duck (player) object
There was a quite large series of nested if-else blocks that resulted in unlocking the “cheat mode”. With the obfuscated variable names, it was extremely unclear what the conditions were.
I spent a couple hours using the debugging tools within Scratch to monitor the values of different variables at different times, and labeled them as best as I could. My exact process was more detailed than I care to write out, but it resulted in the code looking a lot more readable.
It’s worth mentioning that the game followed Celeste’s prologue level pretty much exactly, both with the layout and the mechanics. In the original, near the very end of the level, when the bridge is falling apart the player tries to jump toward the ledge but can’t quite make it. Physics slows down and then stops, and a bird appears to tell the player how to use their dash ability which lets them barely make it to the ledge. This is mimicked in this version, except it’s a brick not a bird.
The start of that long chain of if statements looked like this
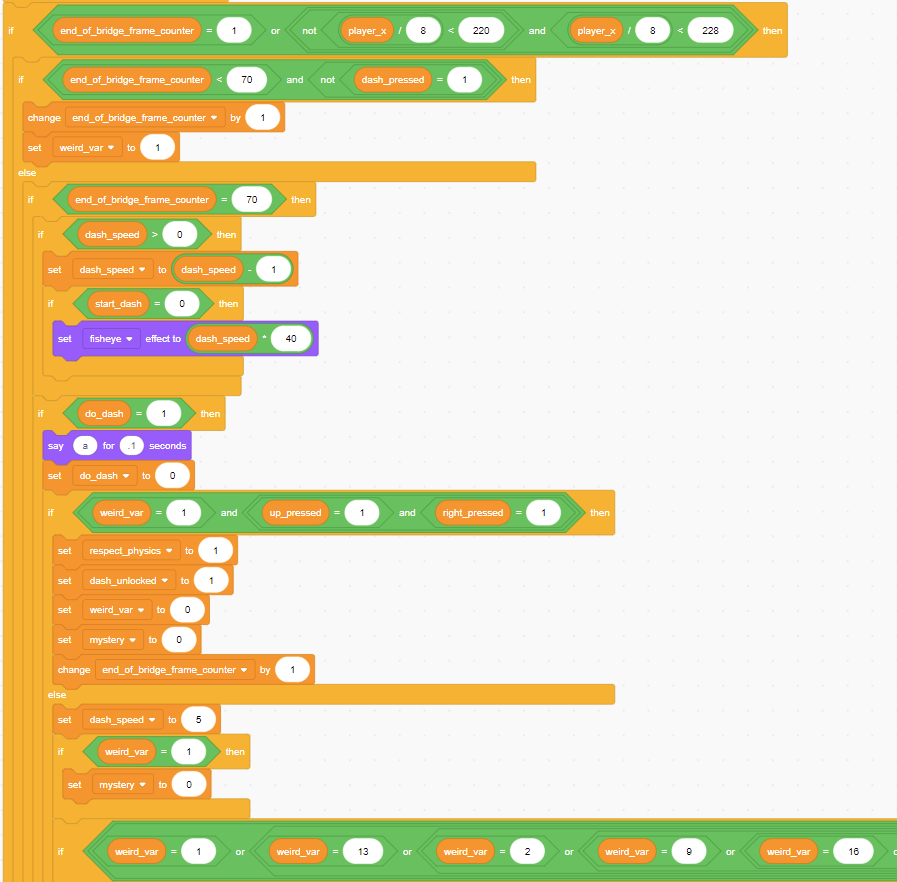
This starts in that suspended physics state. The code appears to create a counter (which I named weird_var). It seems to increment by 1 upon performing a dash that meets certain conditions (a particular direction), otherwise resetting back to 1.
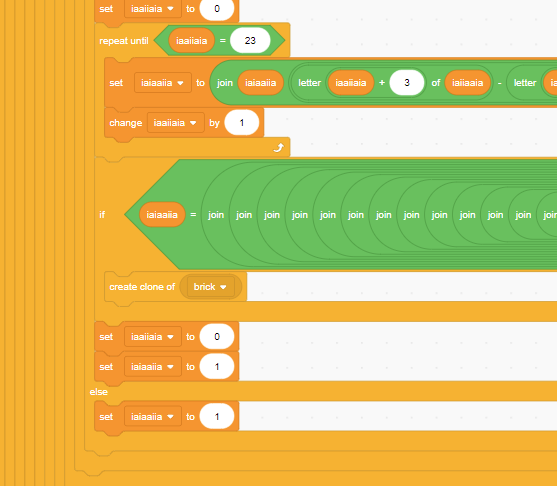
There was quite a bit of obfuscation, but after cleaning it up I could tell that there were 4 distinct parts of the “cheat code”
The first part was 16 inputs long, and simply required a certain input for each, resetting back to the start if any were wrong
1)  down/right
2)  down/right
3)  up
4)  left
5)  up
6)  down/left
7)  down
8)  down/right
9)  down/right
10) down/left
11) up
12) left
13) down/right
14) up/right
15) up/left
16) down/right
The second part turned each input into a number with some logic that looks like this
((left OR (NOT up or right))*2 + ((right AND NOT up) OR (left AND NOT down)) * 2 + ((up OR down) AND (left OR right)))
which equates to these numbers
- up: 0
- up/right: 1
- right: 2
- right/down: 3
- down: 4
- down/left: 5
- left: 6
- left/up: 7
It verifies after the 24th input that the previous 8 inputs, in order, were 32267164. It resets the counter to 1 if this check fails, but only after the final input in the series, so you can’t just brute force which inputs don’t fail the check, you need to actually understand the code.
The sequence for this bit was as follows
17) right/down
18) right
19) right
20) left
21) left/up
22) up/right
23) left
24) down
The third portion does a check that roughly evaluates to this Python code
mystery = "0"+ "".join([i for i in inputs])

assert mystery[0] == "0"
assert int(mystery[::-1]) == int(mystery[16]+"97623387")*89060890
Given the fact that digits we can use have to be between 0 and 7 (not 8 or 9), there are two valid solutions here, 3443013741500671 and 3443013730660562. I learned afterwards that the first solution was unintended, and the “correct” answer was 3443013730660562.
The sequence I wrote down was for the ultimately incorrect option, but still works for the purpose of unlocking the next step
25) right/down
26) down
27) down
28) right/down
29) up
30) up/right
31) right/down
32) left/up
33) down
34) up/right
35) down/left
36) up
37) up
38) left
39) left/up
40) up/right
The final portion looks like this, and does exactly what it seems like
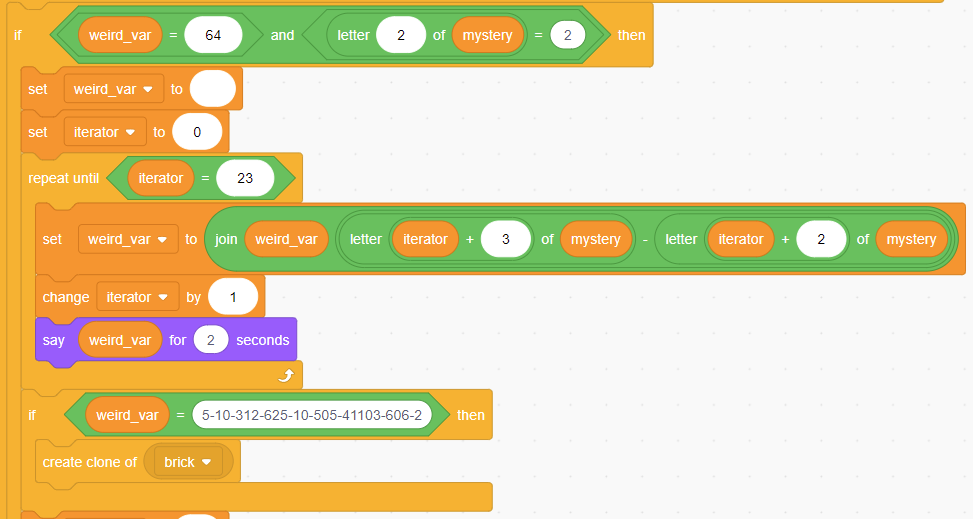
Scratch does some weird stuff with its variables, where they can be treated as both strings and numbers, which made this take a minute or two for me to comprehend, but regardless, the solution here was 276634602766116234471175, the inputs for that being
41) right
42) left/up
43) left
44) left
45) right/down
46) down
47) left
48) up
49) right
50) left/up
51) left
52) left
53) up/right
54) up/right
55) left
56) right
57) right/down
58) down
59) down
60) left/up
61) up/right
62) up/right
63) left/up
64) down/left
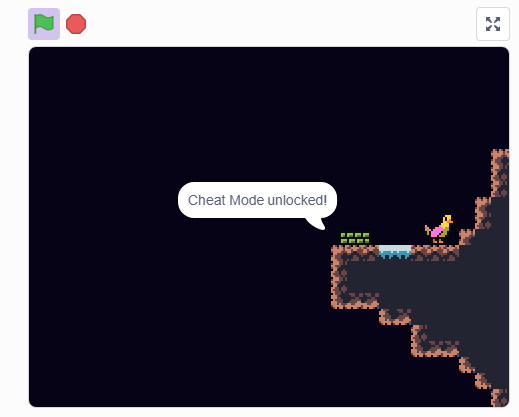
After doing all 64 of these inputs in order, the “Cheat Mode Unlocked” text does in fact show up
The somewhat obvious thing to do here is use the input-to-number encoding the program gives me on the first part of the sequence, and then concatenate it all. Doing that gave me 3306054335063173322671643443013730660562276634602766116234471175. It only really makes sense for these to be octal digits in some form. It took me a moment to figure out exactly how I was supposed to decode it, but it ended up being fairly simple
print(bytes.fromhex(hex(int("3306054335063173322671643443013730660562276634602766116234471175", 8))[2:]).decode())
Running this gave me the flag lactf{intr0_car_g0_brrr}.
Old Site⌗
This challenge was a fairly tricky web challenge, written by the same author as Prologue. Continuing their theme, the challenge title seems to be another Celeste reference (“Old Site” being the name of chapter 2 in the game)
The download we’re given is a NextJS app with mostly static content, and one API endpoint with this code
// Next.js API route support: https://nextjs.org/docs/api-routes/introduction
import fs from "fs"
// TODO(arc) I genuinely forgor what guestbook server I was using back then
// but Aplet123 wants this up now so I'll just polyfill something in Next real quick
export default function handler(req, res) {
try {
if (req.method == "POST") {
if (req.body && req.body["UR MESSAGE"]) {
const msg = req.body["UR MESSAGE"]
// we only allow ASCII text, as the 2000s intended
if (typeof msg == "string" && msg.length > 0 && /^[ -~]+$/.test(msg)) {
let messages = fs.readFileSync("guestbook.txt", { encoding: "ascii" }).split("\n")
messages.push(msg)
fs.writeFileSync("guestbook.txt", messages.join("\n"))
}
res.redirect(303, "/")
return
}
} else if (req.method == "GET") {
const messages = fs.readFileSync("guestbook.txt", { encoding: "ascii" }).split("\n")
const list = messages.map(m => `<LI>${m.replace("&", "&").replace("<", "<").replace(">", ">")}</LI>`).join("")
const html = `<!DOCTYPE HTML PUBLIC "-//W3C//DTD HTML 4.01//EN" "http://www.w3.org/TR/html4/strict.dtd"><HTML><HEAD><TITLE>arcblrost's guestbook!!!</TITLE></HEAD><BODY TEXT="white"><FONT FACE="Comic Sans MS"><UL>${list}</UL></FONT></BODY></HTML>`
res.setHeader("Content-Type", "text/html")
res.status(200).send(html)
return
} else {
res.status(405).end()
return
}
} catch {
res.status(500).end()
}
}
There’s no admin bot for this challenge or anything, so XSS seems completely off the table, despite maybe being possible here (I didn’t look into that too closely to confirm it). This code lets us write one line of ASCII at a time to the guestbook.txt file. The challenge’s Dockerfile was this
FROM node:23.7.0-alpine3.20
ENV NEXT_TELEMETRY_DISABLED=1
RUN apk add --no-cache libc6-compat
RUN addgroup --system --gid 1001 nodejs
RUN adduser --system --uid 1001 nextjs
ARG FLAG="lactf{fake_flag}"
RUN printf "\"$FLAG\"" > /flag.txt
RUN chmod a+r /flag.txt
WORKDIR /app
COPY package.json pnpm-lock.yaml ./
RUN corepack enable pnpm && pnpm i --frozen-lockfile
COPY jsconfig.json next.config.mjs guestbook.txt ./
COPY pages ./pages
COPY public ./public
RUN mkdir .next
RUN chown nextjs:nodejs /app/.next
RUN chown nextjs:nodejs /app/guestbook.txt
USER nextjs
RUN pnpm --version
EXPOSE 3000
ENV PORT=3000
ENV HOSTNAME="0.0.0.0"
CMD ["pnpm", "run", "dev"]
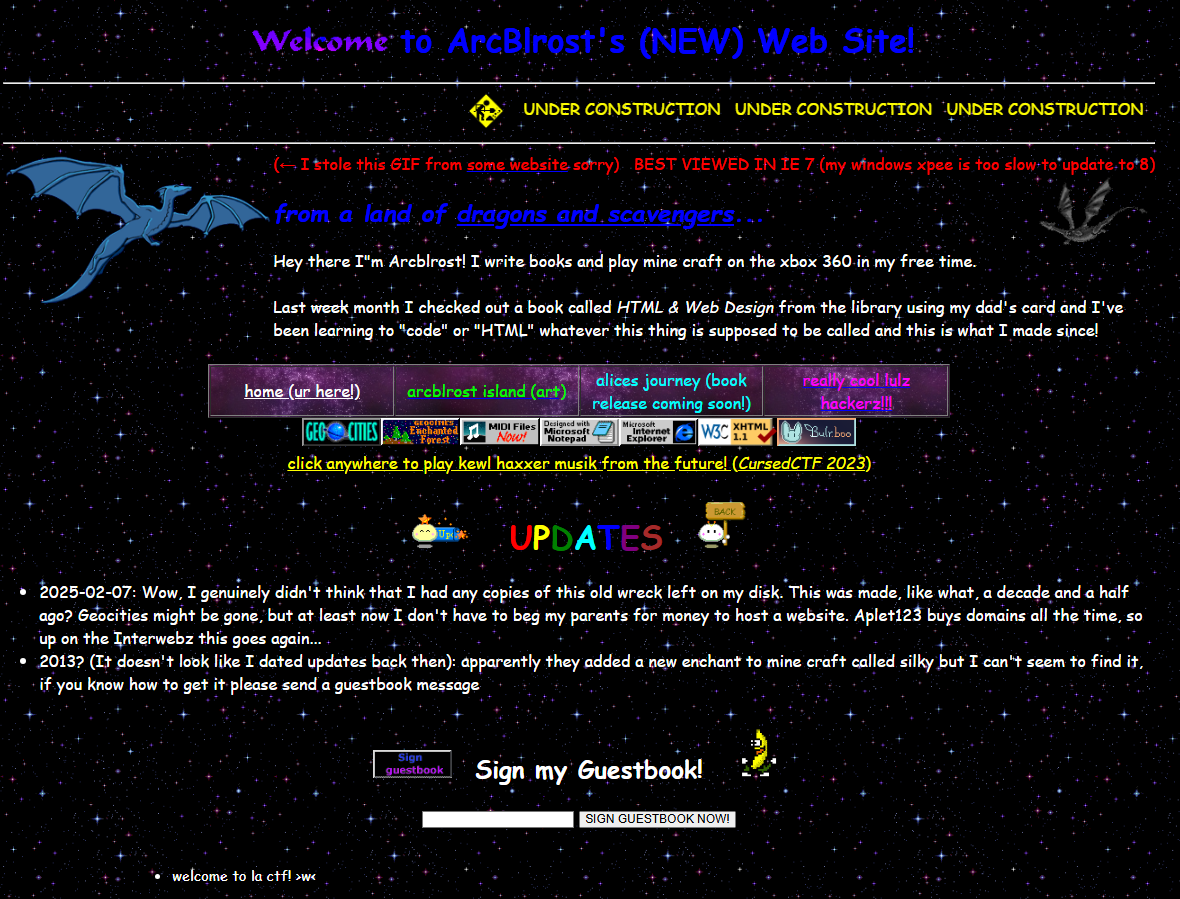
Running the application, I could see a simple Geocities-style personal website
Entering text into the “sign guestbook” field calls that API endpoint and updates the contents of the guestbook on the page. The guestbook is loaded in an iframe.
Two somewhat important things to mention are that the flag is in /flag.txt with quotes around it, and the challenge is one-instance-per-team, suggesting the solution defaces the container somehow.
It took a bit to figure this out, but eventually I realized that the way the site was being run (with next dev --turbopack in the package.json) included some default routes for NextJS, including /__nextjs_source-map. This endpoint takes a file path as a query parameter, and uses it to serve source maps for debugging purposes. Notably, I can write to a file on the system (guestbook.txt).
As turns out, if a source map file has a line that looks like this
//# sourceMappingURL=/flag.txt
it will try opening that file and parsing it as JSON before serving it. The source code for that is here
if (pathname !== '/__nextjs_source-map') {
      return next()
    }

    let filename = searchParams.get('filename')

    if (!filename) {
      return badRequest(res)
    }

    // TODO(veil): Always try the native version first.
    // Externals could also be files that aren't bundled via Webpack.
    if (
      filename.startsWith('webpack://') ||
      filename.startsWith('webpack-internal:///')
    ) {
      const sourceMap = findSourceMap(filename)

      if (sourceMap) {
        return json(res, sourceMap.payload)
      }

      return noContent(res)
    }

    try {
      // Turbopack chunk filenames might be URL-encoded.
      filename = decodeURI(filename)

      if (path.isAbsolute(filename)) {
        filename = url.pathToFileURL(filename).href
      }

      const sourceMapString = await project.getSourceMap(filename)

      if (sourceMapString) {
        return jsonString(res, sourceMapString)
      }

      if (filename.startsWith('file:')) {
        const sourceMap = await getSourceMapFromFile(filename)

        if (sourceMap) {
          return json(res, sourceMap)
        }
      }
    } catch (error) {
      console.error('Failed to get source map:', error)
    }
This can’t be used for reading any file, only a file that parses as json. Luckily, the Dockerfile puts the flag in quotes, which makes it count as parse-able json.
I was able to add //# sourceMappingURL=/flag.txt to the guestbook, and then request the URL /__nextjs_source-map?filename=/app/guestbook.txt, which gave me the flag cyber{once upon a time the web was new, the gifs were fresh, and the world was our city. what would it take for us to go back to that?}
Mikumikubeam⌗
We’re given three files, create.sh, mikumikubeam.png, and mikumikusteg.png
The create.sh script looks like this
#!/bin/sh
rm -rf build
mkdir build

flag="Pidgeon"

# below msg size and offset taken from docs
# miku actually randomized msg and offset owo
msgsize="50x40"
offset="+15+2"

# create the message gif
magick -gravity center -size $msgsize label:"$flag" build/message.gif
magick identify build/message.gif

# create steg image using imagemagick steg operator
magick composite build/message.gif mikumikubeam.png -stegano $offset build/mikumikusteg.png

cp build/mikumikusteg.png .
This uses ImageMagick’s stegano tool to embed the flag image inside the original, after creating the flag image from the flag as text.
We’re not told how large the flag message is, or what the actual offset used is.
The first thing I did to try solving this was to investigate how stegano worked with some test images. After some basic testing, it seems that
the process converts the image to 16-bit colors (from 8 normally), and hides the payload in the least significant bit. It also seems to do some weird stuff
with converting the payload to grayscale, but we know the flag has to be greyscale here so that doesn’t matter.
Here’s the script I wrote for finding the least significant bits of an image and amplifying them to be visible
from PIL import Image
import cv2

steg = cv2.imread("mikumikusteg.png", cv2.IMREAD_UNCHANGED)

new = Image.new("RGB", (steg.shape[1], steg.shape[0]))
for y in range(steg.shape[0]):
    for x in range(steg.shape[1]):
        pix1 = steg[y, x]

        r1 = (pix1[0] & 0b1) *255
        g1 = (pix1[1] & 0b1) *255
        b1 = (pix1[2] & 0b1) *255
        newpix1 = (r1,g1,b1)

        new.putpixel((x,y), newpix1)

new.save("new.png")
that gave me an output that looked like this
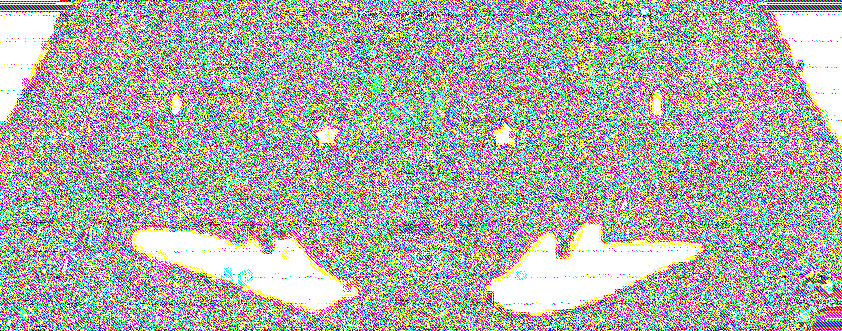
This vaguely resembled the original image, but also notably had a repeating pattern of pure red/green/blue at the top. From my brief investigation into how stegano works, I learned that it encodes bytes one bit per pixel at a time, setting either red, green, or blue (in cyclic order) to the value of the bit.
As an example, I encoded a mostly white image (with a little bit of black text) over a black background, and got this result
Most of the bytes in the payload were 0xFF, so this was expected. It encoded consistent red/green/blue cycles for the background, with occasional blank spots for the dark parts.
This gets a little trickier when the base image isn’t blank, but here’s a script I wrote to make it work. This parses the output image from the previous step, not the original.
from PIL import Image

img = Image.open("new.png")

width, height = img.size

offset = 1
for j in range(0,height):
    i = 0
    for x in range(width):
        pix = img.getpixel((x,j))
        if (i-j+offset) % 3 == 0:
            newpix = (pix[0],0,0)
        elif (i-j+offset) % 3 == 1:
            newpix = (0,0,pix[2])
        elif (i-j+offset) % 3 == 2:
            newpix = (0,pix[1],0)
        img.putpixel((x,j), newpix)
        i += 1

img.save("cleaned.1.png")
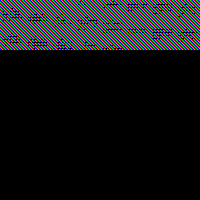
There were three different possible options for “offset”, each meaning starting at a different place in the red/green/blue cycle. I tried each one, and while offsets 0 and 2 showed me mostly noise, offset 1 looked like exactly what I got from my test images.
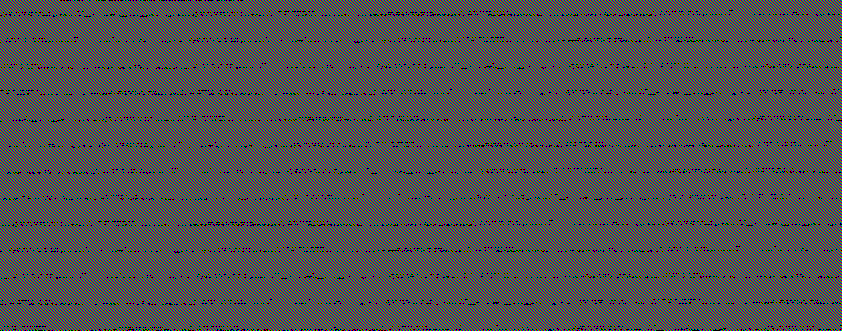
I wrote a script that looked over this image and printed a 1 if the pixel had color, and 0 of the pixel was black, and got a massive string of 1s and 0s. I put the output into CyberChef and used the “generate image” tool which lets you change the number of pixels per row.
It took a bit of messing with things, but eventually with pixels per row set to 192, I saw what was clearly the flag
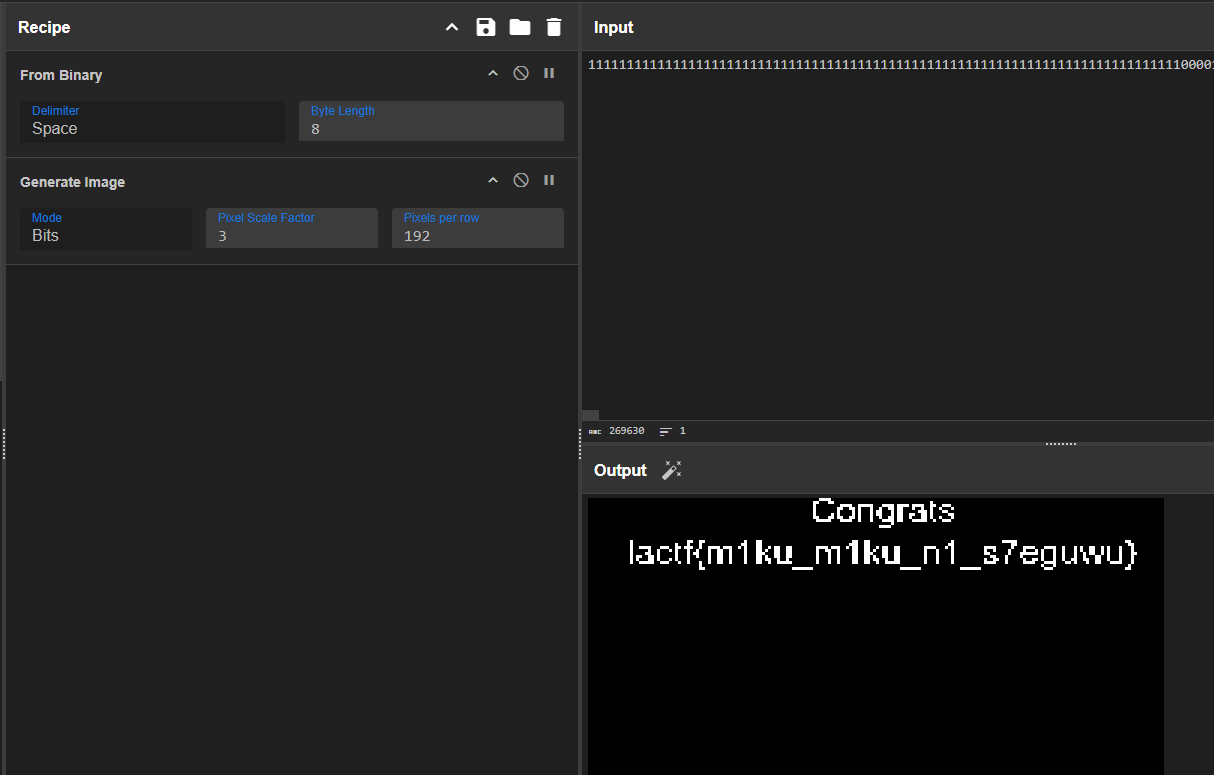
lactf{m1ku_m1ku_n1_s7eguwu}
Whack-A-Mole⌗
This was a web challenge that ended up being more of a crypto. The handout is a simple-ish Flask server that runs a game of whack-a-mole that seems mostly pointless.
@app.post("/login")
def login():
    name = str(request.form.get("username"))
    funny_num = int(request.form.get("funny"))
    password = bytes((ord(ch) + funny_num) % 128 for ch in flag).decode()
    session["username"] = name
    session["sudopw"] = password
    return redirect("/game")


@app.post("/whack")
def whack():
    if "username" not in session:
        return {"err": "login pls"}

    if session["username"] == session["sudopw"]:
        return {"win": True}

    return {"mole": rng.randrange(5), "win": False}

@app.get("/")
def index():
    return render_template("index.html")

@app.get("/game")
def game():
    if "username" not in session:
        return redirect("/")
    return render_template("game.html", username=session["username"])
Something interesting that it does is override the default Flask cookie encoder system to use encryption
flag = os.environ.get("FLAG", "lactf{owo_uwu}")

app = Flask(__name__, static_folder="static")
app.secret_key = os.urandom(32).hex()

key = Fernet.generate_key()
f = Fernet(key)
print(key, flush=True)
class EncryptedSerializer(URLSafeTimedSerializer):
    def load_payload(self, payload, *args, serializer = None, **kwargs):
        encrypted = base64_decode(payload)
        decrypted = f.decrypt(encrypted)
        return super().load_payload(decrypted, *args, serializer, **kwargs)

    def dump_payload(self, obj):
        decrypted = super().dump_payload(obj)
        encrypted = f.encrypt(decrypted)
        return base64_encode(encrypted)

# impl yoinked from https://github.com/pallets/flask/blob/f61172b8dd3f962d33f25c50b2f5405e90ceffa5/src/flask/sessions.py#L317
class EncryptedSessionInterface(SecureCookieSessionInterface):
    def get_signing_serializer(self, app):
        if not app.secret_key:
            return None

        keys: list[str | bytes] = [app.secret_key]

        return EncryptedSerializer(
            keys,  # type: ignore[arg-type]
            salt=self.salt,
            serializer=self.serializer,
            signer_kwargs={
                "key_derivation": self.key_derivation,
                "digest_method": self.digest_method,
            },
        )

app.session_interface = EncryptedSessionInterface()
Looking at the source code for the original dump_payload, I could see that it uses zlib compression
    def dump_payload(self, obj: t.Any) -> bytes:
        json = super().dump_payload(obj)
        is_compressed = False
        compressed = zlib.compress(json)

        if len(compressed) < (len(json) - 1):
            json = compressed
            is_compressed = True

        base64d = base64_encode(json)

        if is_compressed:
            base64d = b"." + base64d

        return base64d
It only does the compression if the compressed size is smaller. The pre-encoding value of the cookie is something like {"username":"meow","sudopw":"lactf{owo_uwu}"} as long as you specify funny: 0 when signing up. I couldn’t end up finding any use for the funny feature.
The cookie is encrypted with Fernet, which uses a 16-byte block size. The key is generated randomly and securely, so decoding the cookie seems out of the question. However, we can make guesses about properties of the decrypted text based on how long the encrypted data is.
I was able to estimate that the flag was 47 chars long by running the encryption myself with my own key while controlling the length of the username, and testing to see how many chars I needed to add to changed the number of blocks in the Fernet output.
It was also possible to figure out whether or not compression was used based on this length. If the number of total chars remains the same, but the output length decreases, it strongly suggests the zlib compression made the output shorter.
Zlib compression works best if the data is low-entropy, here meaning repeating sequences. It’s more likely to compress the data if the same string appears in the data more than once. If you put the flag as your username, the flag shows up in the input data twice, which gets compressed really easily.
I was able to leak the flag one character at a time by padding the username to not repeat the ":" in the json followed by a guess at a substring of the flag. When the cookie gotten from the server was shorter, it meant that compression was used (and therefore the string a match). I wrote a script to automate this. I needed to start it out with 8 chars from the flag which I got by guessing, since the flag format was lactf{}, and I found the wh from some manual testing before writing the script
import requests, base64, string

FLAG = 'lactf{wh'
ENDPOINT = "https://whack-a-mole.chall.lac.tf"

data = {
    'username': '',
    'funny': '0'
}


for i in range(47):
    for c in '_}' + string.ascii_lowercase + string.digits + string.ascii_uppercase:
        data['username'] = '!'+FLAG[-8:]+c+'%$'
        s = requests.Session()
        r = s.post(ENDPOINT+"/login", data=data)
        d = (base64.b64decode(s.cookies['session'].split(".")[0].encode()+b'==').decode())
        if len(d) < 248:
            FLAG += c
            print(FLAG)
            break
Running this printed out the flag one character at a time
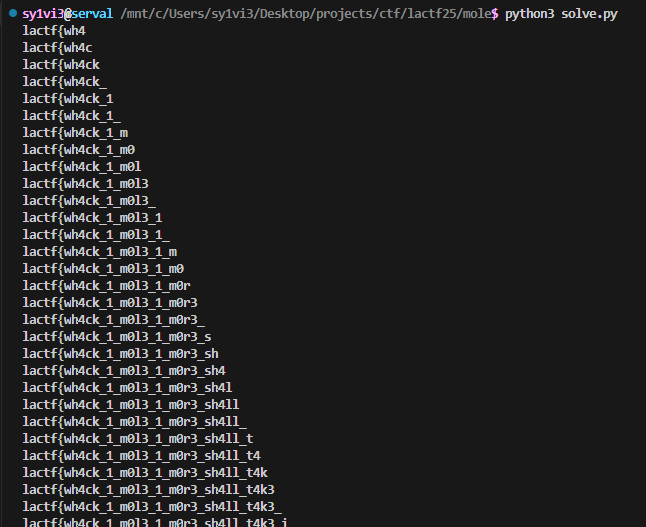
After a minute or two I had the flag lactf{wh4ck_1_m0l3_1_m0r3_sh4ll_t4k3_it5_pl4c3}