

Introduction⌗
Over the past few months, I’ve been working on developing a system to scan and map Pokémon GO spawns (among other things) for my local community. I don’t play enough to really take advantage of it myself, but hopefully others find it useful. My true goals here were twofold:
- Gain experience developing computer programs, reverse engineering, and networking
- If it works, potentially gain a small source of passive income to support myself while attending university
Background Research⌗
When Pokémon GO was first released in 2016, it had an exposed API that allowed pretty much anyone with the required knowledge to build all sorts of maps and tools to assist players. This was fixed after not very long, and for quite some time it became something of a cat-and-mouse game between Niantic, the developers of the game, and the developers in the community trying to exploit it.
After not too long, some other solutions were created, which relied on gaining API access by paying a third-party service known as Bossland for keys. Unlike previously, where mapping the whole world with a single account was possible, the new system was much more limited. Mapping primarily became a paid service localized to certain cities. It still wasn’t too hard, but it took enough time and money to set up that maps weren’t provided free for users anymore.
In March of 2018, some further security updates by Niantic forced practically all mapping services offline for good. The use of Google’s SafetyNet API made it so that only real, physical devices could access the game and its data. Not to be beaten, community developers eventually managed to come up with another solution that met the new challenge Niantic’s security posed. At first, the new mapping tools used a system of using automated tools to spoof real phones’ (primarily iOS devices) locations, and use image parsing software to extract data from them. This was painfully slow, and could really only be used for mapping raids.
Around 2020, some new software was created that made mapping Pokémon spawns, at least in small amounts, practical again. Known as RealDeviceMap, it worked by directing devices around an area at a decent pace, received the game protos, and decoded and displayed the information in them on a map interface. Notably, it wasn’t able to do anything by itself. RDM required (and still does) a man-in-the-middle program to be running on the devices operating the game. Such programs use a variety of techniques to hook into the game’s functions, directly intercepting data, far more efficiently than image analysis. The way these MiTM programs work is incredibly interesting to me, and in the process of setting up my map, I took a large detour to investigate them. I learned a lot, but for the same reason that all existing MiTM software is closed-source (the desire to not get stopped by Niantic), I won’t be elaborating on what I did or how I did it.
At some point in the process, the primary system of mapping switched from relying on iOS devices to rooted Android ones. Most mapping setups these days actually run on Android TVs, as they’re substantially cheaper than used smartphones, and they are easy to set up on racks without needing to deal with exploding batteries.
I was lucky enough to have some friends provide me with a few Android TVs I could use, and another friend nice enough to lend me a very fancy PoE network switch for connecting all the devices to the internet.
When I was researching what software I wanted to make use of, I originally stumbled across Map’A’Droid (MAD), but I quickly learned that MAD was very inefficient and instead moved to RealDeviceMap, and later a different option
My Setup⌗
The setup I ended up with has many moving parts that all need to work in tandem with each other to make the final product work. I use the following open source software:
- RealDeviceMap
- Used as the central controller for directing devices and parsing game data
- ReactMap
- The frontend I’m using to display data to users
- Koji
- A backend tool for creating geofences and optimizing routes
- PoracleJS
- Used for sending Pokémon alerts to my discord server
- MariaDB
- Stores all relevant map data
- TileServer GL
- Generates the OpenStreetMap tile images that Poracle displays when sending an alert
- Grafana
- A backend tool for monitoring the state of my devices
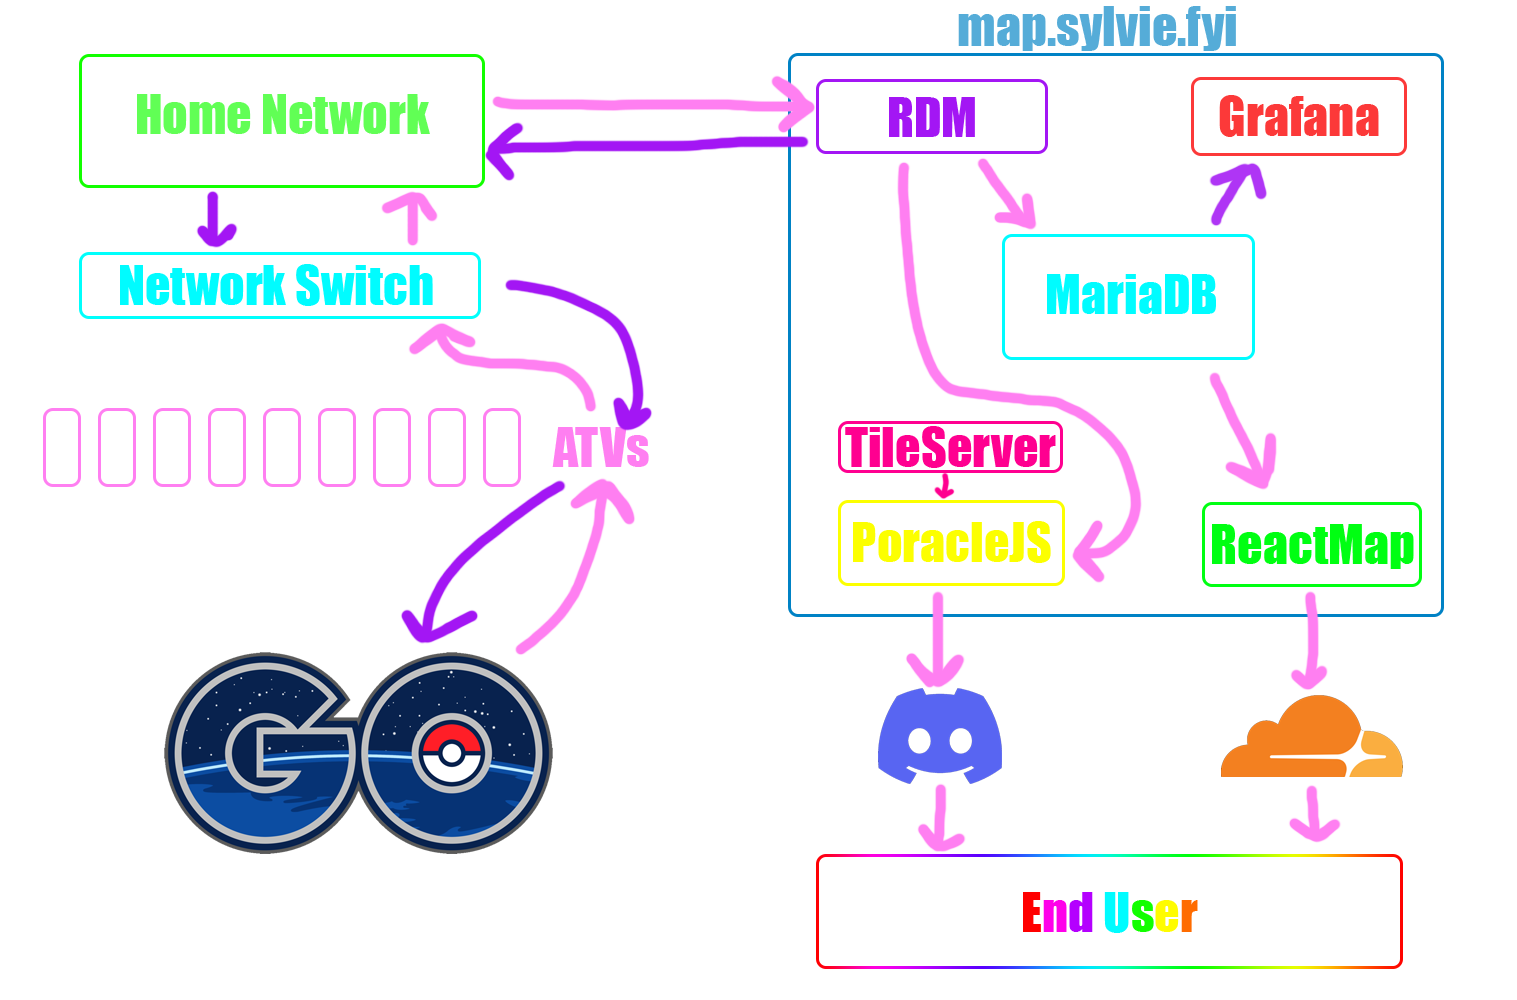
Here’s a diagram of how all the different components work together.
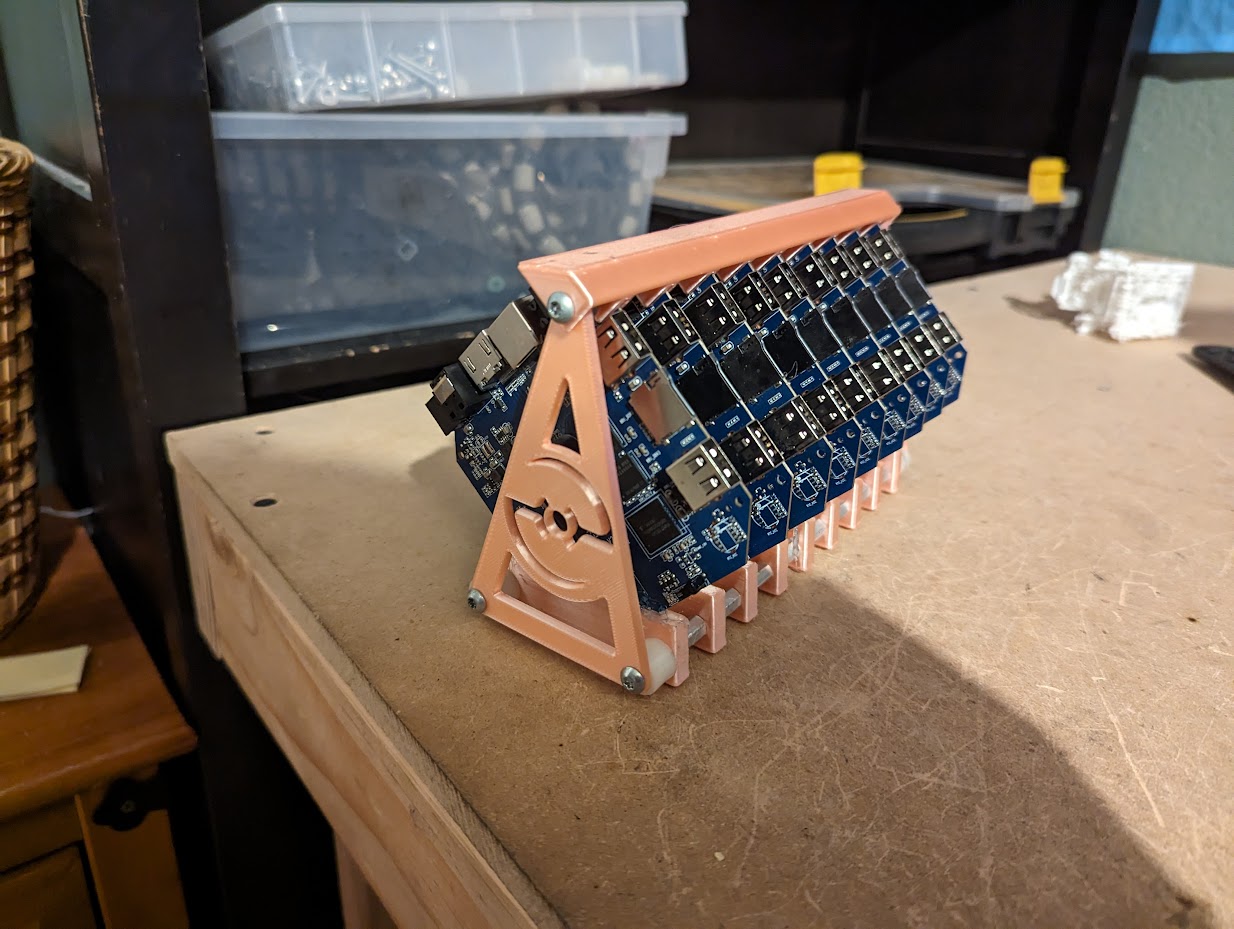
I designed and 3D-printed a holder for the ATV boards using Autodesk Inventor and my Ender 3.
 1
1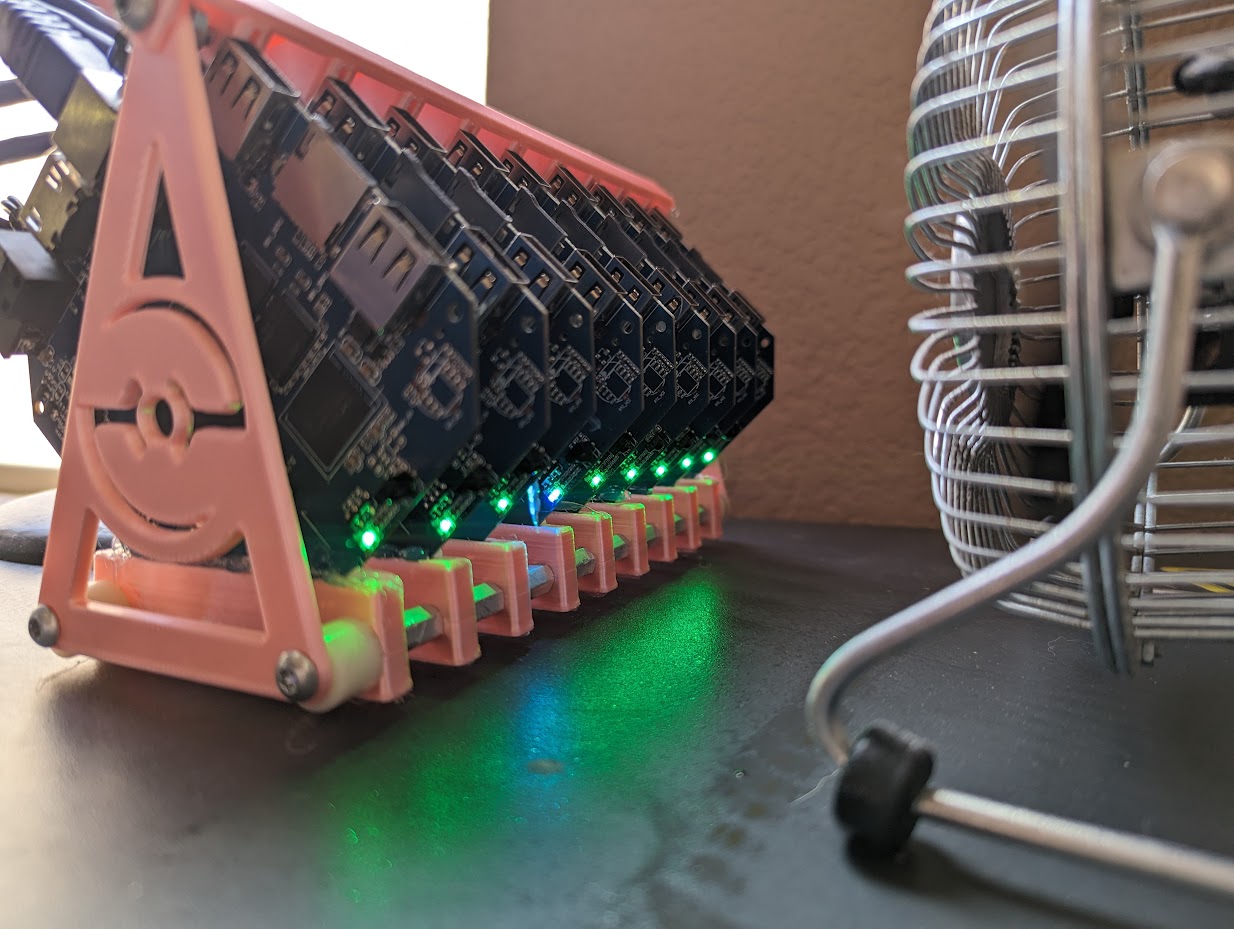
Problems I Encountered⌗
In the process of configuring my setup, I ran into quite a few challenges I had to overcome. First and foremost was an issue with ATV connection to my network. At first, I was using a 32-bit ROM on the ATVs such that they could have a wireless connection to my router. This was because I didn’t have a network switch I could use for this. The 32-bit ROMs ended up having issues connecting and staying connected. In my experience, if the connection dropped once, it would stay dead until the TV power cycled. Additionally, every box came with the exact same MAC address from the factory, which made networking… complicated. I had to learn how to change their hardware addresses, and in the process learned that the first octet of a MAC address needs to be even.
Eventually, I was able to acquire a proper network switch from a friend, which allowed me to switch to the 64-bit ROMs which didn’t have working wireless. The ethernet connection turned out to be much more stable, but I still ran into issues with high device downtime.
As it turned out, this was not just a me-issue, and the developers of the software I was using were working on a fix for it. After finally getting around to applying the fix, it ended up working very very well.
Configuration⌗
I spent quite a bit of time configuring and setting up my map for public use. The first step after creating and leveling accounts was using Koji to generate 80-meter circles over the entire area I planned to scan. This was a surprisingly CPU-intensive process, and it took several tries before I realized how to do it correctly.
I then ran the scanner on those points generated for a day or so, and it found all of the spawn points in the region. With this new information, I was able to use Koji to optimize scan locations to hit as many spawn points in as few jumps as possible.
The next step after this was to run the scanners on that data set for several days to find all of the despawn timers for each spawn point so that when it finds a spawn, it’s not guessing about how much time is left on it.
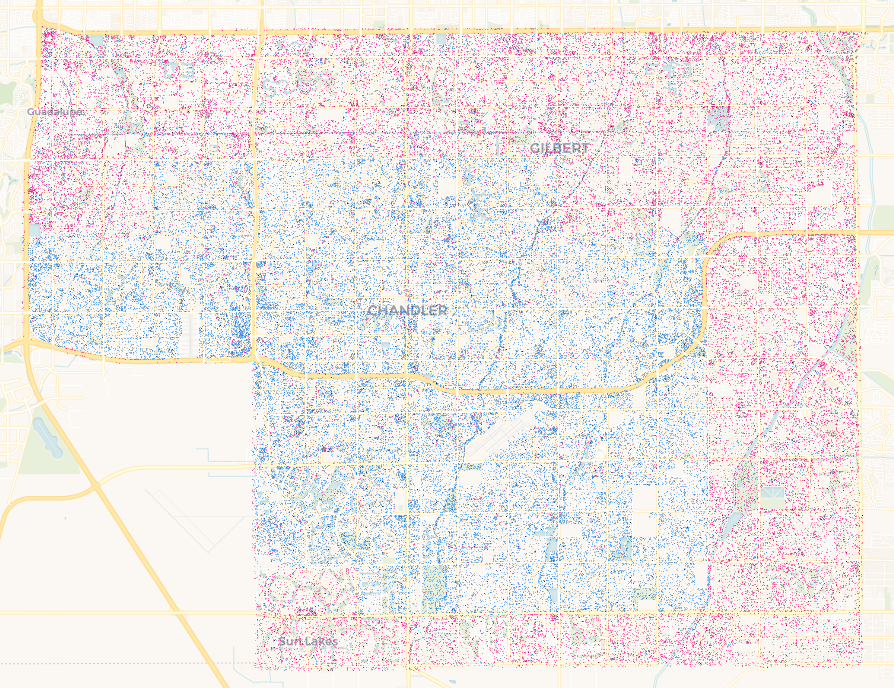
The blue dots are spawn points with known timers, and the red dots are spawn points with timers still unknown.
I also needed to configure how I wanted to authenticate users into my mapping interface. I decided that doing it via Discord and Ko-Fi would be the right way. While I was developing things I made the map free for public access, but now that I have it working properly, I’m going to start charging for access to make up some of the costs I spent developing it.
For the first two months, all map access will be $5, but after that it will be $5 for raids and Rocket invasions and $10 for full access to spawns and quests. I may adjust these values in the future depending on how many signups I get.
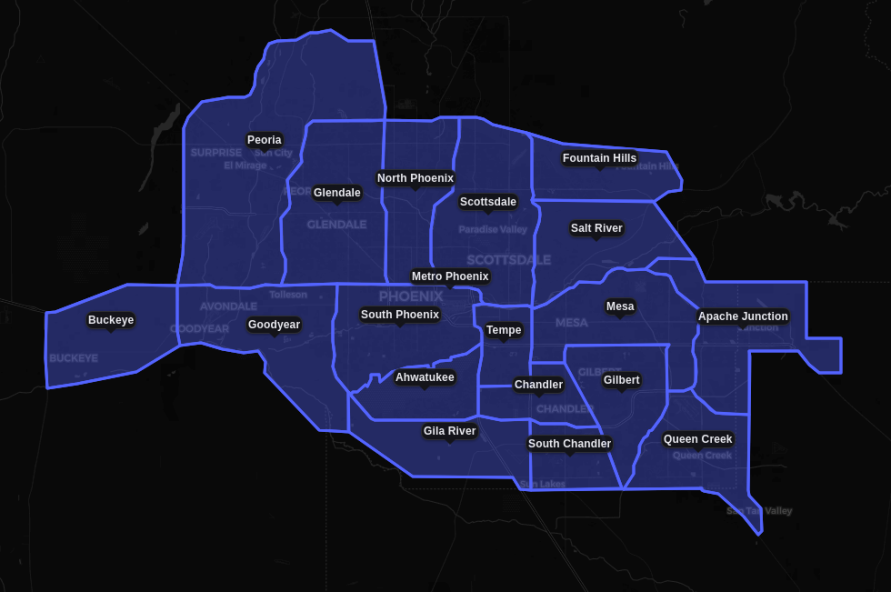
This is the final coverage area I decided on for now, which takes into account how many devices I have to scan with, how many players live in these areas, and how long the average despawn timer will be upon scan time.
My map is available at map.sylvie.fyi, and the Ko-Fi sign up page is at ko-fi.com/sy1vi3.